Let's dive deeper into the topic of macros in Microsoft Word. We will add the user interface for our macro, which replaces two or more consecutive line breaks with a single one. Why would you ever need some kind of interface for a macro? Well, for example, you want to remove extra line breaks on all pages of the document, except for some specific ones. The interface would allow you to specify the page numbers that you want to skip during processing (or vice versa, only process specified pages). This is the functionality we will implement.
Open the familiar VBA window by clicking "Visual Basic" on the "Developer" panel. Add a new user form to our macros by right-clicking on "Normal" and selecting "Insert" -> "UserForm":

A new form with the name UserForm1 will appear. You can rename it, as well as change other properties of the form, on the "Properties" tab:

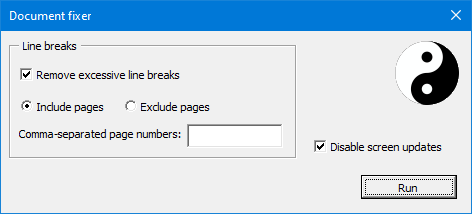
I will name the form DocumentFixer. Let's add some controls to the form. We will create a frame with some settings and the "Enable" checkbox for our macro. When you click on the form, a Toolbox will appear, where you can select controls to be added:

After placing a certain number of controls on the form, it looks like this:

You can preview the form by clicking on it in the editor and pressing F5 or the "Run" button in the VBA editor interface, which can also run macros for debugging. I've added the following controls to the form:
- The "Line breaks" frame, where all the settings for our macro are located.
- The "Remove excessive line breaks" checkbox, which will enable or disable our macro. I called this element
RemoveExcessiveLineBreaks. - Two radio buttons: "Include pages" (named
ExcessiveLineBreaksIncludePages) and "Exclude pages" (namedExcessiveLineBreaksExcludePages) that specify which pages should be processed or excluded from processing, respectively. To bind these radio buttons together, set the same value for theirGroupNameproperty. I set it toExcessiveLineBreaksPageOption. - The text field (named
ExcessiveLineBreaksPageNumbers) with the "Comma-separated page numbers" label, where the user can enter comma-separated page numbers. - The "Run" button named
RunMacros, which will run the selected macros (we only have a single one so far).
Of course, this is not flexible like HTML or WPF, but it’s quite possible to implement some kind of graphical user interface. Double-click on the "Run" button on the form, and this will automatically generate code for the button click event handler. It looks like this for me:
|
1 2 3 |
Private Sub RunMacros_Click() End Sub |
For now, let's leave this handler and write a function below it that will parse comma-separated page numbers.
|
1 2 3 4 5 6 7 8 9 10 11 |
Private Function ParsePageNumbers() Dim pageNumbersCollection As New Collection Dim pageNumbers() As String pageNumbers() = Split(Me.ExcessiveLineBreaksPageNumbers.Text, ",") On Error Resume Next Dim i As Integer For i = 0 To UBound(pageNumbers) pageNumbersCollection.Add True, Trim$(pageNumbers(i)) Next Set ParsePageNumbers = pageNumbersCollection End Function |
In this function, we create a new pageNumbersCollection collection (essentially an indexed associative array), as well as a pageNumbers array. In line #4, we split the page numbers string from the ExcessiveLineBreaksPageNumbers textbox and put the result to the pageNumbers array (note the Me prefix: we refer to the current form). Line #5 sets up a handler to ignore all errors. Then we add all page numbers to the pageNumbersCollection collection in the loop. If there are duplicate page numbers, then the error will not occur, because we ignore them. Please note that when returning from a function or assigning a variable to any object created via New, you need to use the Set keyword.
Now, let's return to the RunMacros_Click handler and write code that will call our macro with the necessary parameters. I will write comments directly in the code, as it is quite long:
|
1 2 3 4 5 6 7 8 9 10 11 12 13 14 15 16 17 18 19 20 21 22 23 24 25 26 27 28 29 30 31 32 33 34 35 36 37 38 |
Private Sub RunMacros_Click() ' If an error occurs, go to the ErrorHandler label On Error GoTo ErrorHandler Dim pageNumbers As Collection ' If the RemoveExcessiveLineBreaks checkbox is set, ' parse entered page numbers If Me.RemoveExcessiveLineBreaks.value = True Then Set pageNumbers = ParsePageNumbers() End If ' Hide our form Me.Hide ' Activate the current document ActiveDocument.Activate ' If the RemoveExcessiveLineBreaks checkbox is set... If Me.RemoveExcessiveLineBreaks.value = True Then ' ...execute the RemoveExcessiveEntersImpl function. ' We will write it later. We pass page numbers ' as well as the ExcessiveLineBreaksIncludePages ' radio button value to this function RemoveExcessiveEntersImpl pageNumbers, _ Me.ExcessiveLineBreaksIncludePages.value ' Page numbers collection is no longer needed Set pageNumbers = Nothing End If ' Everything is OK, go to the Finish label GoTo Finish ErrorHandler: ' If an error occurs, show a message box with its text MsgBox Err.Description, vbError, "Error" Finish: MsgBox "Done!", vbInformation, "Ready" End Sub |
It remains to implement the RemoveExcessiveLineBreaksImpl function, which will take two parameters: a page numbers collection with numbers that we need to either skip or, on the contrary, process only them. The second parameter (the value of the ExcessiveLineBreaksIncludePages radio button) exactly tells what to do with these page numbers (True - process only them, False - exclude them from processing). The user can also leave the page numbers textbox empty, in this case the collection will be empty as well, and the macro will ignore this option.
Let's open the AllMacros module file by double-clicking on its name. I implemented it in the previous post. We'll write some auxiliary private functions. We will need to determine if a key exists in the collection to find out if the current page is in the list of pages specified by the user:
|
1 2 3 4 5 6 |
Private Function HasKey(coll As Collection, key As String) As Boolean On Error Resume Next coll (key) HasKey = (Err.Number = 0) Err.Clear End Function |
VBA collections are extremely truncated: keys can only be strings, that's why I didn't convert page numbers to integers when parsing them, and the HasKey function also takes the value key of String type. In this function, we try to query the key from the collection (line #3). If something goes wrong, an error will occur, that we process with the handler from line #2. If the error number is not zero (i.e., an error has occurred), then the key is not in the collection. We'll return this value from the HasKey function and clear the error number afterwards.
Now we’ll write a helper function that determines whether it's required to delete unnecessary line breaks on the current page:
|
1 2 3 4 5 6 7 8 9 10 11 12 13 14 15 16 17 18 19 20 21 22 23 24 25 26 27 28 29 30 31 32 |
Private Function NeedToProcessCurrentPage(pageNumbers As Collection, _ includePageNumbers As Boolean) As Boolean ' If the collection is not passed, we process ' all pages If pageNumbers Is Nothing Then NeedToProcessCurrentPage = True Exit Function End If ' If no page numbers were entered, ' we always process everything If pageNumbers.Count = 0 Then NeedToProcessCurrentPage = True Exit Function End If ' Check if current page number exists ' in the collection. We query the page number from ' the current selection range and convert it to string Dim hasPageInCollection As Boolean hasPageInCollection = HasKey(pageNumbers, _ CStr(Selection.Range.Information(wdActiveEndPageNumber))) ' If includePageNumbers = True, then we process the page, ' only if its number exists in the collection. Otherwise, ' we process it only if its number is absent If includePageNumbers = True Then NeedToProcessCurrentPage = hasPageInCollection Else NeedToProcessCurrentPage = Not hasPageInCollection End If End Function |
Finally, the main function that will do the replacement work:
|
1 2 3 4 5 6 7 8 9 10 11 12 13 |
Sub RemoveExcessiveLineBreaksImpl(pageNumbers As Collection, _ includePageNumbers As Boolean) Dim lineBreakSearchRegExp As String lineBreakSearchRegExp = GetLineBreakSearchRegExp() Selection.HomeKey Unit:=wdStory While FindNextText(lineBreakSearchRegExp, True) = True If NeedToProcessCurrentPage(pageNumbers, includePageNumbers) Then RemoveNextEnters End If Wend ClearFindAndReplaceParameters End Sub |
Please note that this function is not private (public by default), since it must be visible to our form. This function will not appear in the list of Word macros, because it accepts arguments. Only functions with no parameters are displayed in the list. The function is almost completely identical to the RemoveExcessiveEnters macro from the first part of the article, except that it takes a couple of arguments. Also, before calling RemoveNextEnters it checks whether it is necessary to remove line breaks by calling NeedToProcessCurrentPage. To avoid code duplication, we’ll fix our old macro RemoveExcessiveEnters so that it calls this function, too:
|
1 2 3 |
Sub RemoveExcessiveEnters() RemoveExcessiveLineBreaksImpl Nothing, False End Sub |
This way we saved the old macro and avoided code duplication: this macro will now call our new function with parameters for replacing extra line breaks on all pages (just like it did before). The last thing we need is a function that will appear in the list of Word macros and show our form. Everything is very simple here:
|
1 2 3 |
Sub FixDocument() DocumentFixer.Show End Sub |
Now we can check the macro! In Word, click "Developer" -> "Macros" and double-click "FixDocument" in the list. The form will open, where you can set the parameters and click "Run", which will execute our macro!
There are several improvements that would be nice to add. Firstly, when running a macro on a large document, the Word screen will be continuously updating, which can make Word freeze and produce unpleasant visual effects. In addition, there is no way to track the progress of macro execution. Let's fix all these issues. I'll start with the option to disable screen updates during macro execution. I will add a checkbox with the name DisableScreenUpdates to the form, and refine the code of the "Run" button click handler the following way:
|
1 2 3 4 5 6 7 8 |
... Me.Hide ' This is the line added If Me.DisableScreenUpdates.value = True Then Application.ScreenUpdating = False ActiveDocument.Activate ... |
Now the Word screen will not be updated during the macro execution (if the user checks the checkbox). Good, now let's move on to displaying the progress of an operation. Moreover, let's make it possible to cancel the operation. We could start our macros on a huge document, having some options set incorrectly. In this case, it would be nice to cancel execution, adjust the settings, and restart the macros. Add a new form and name it MacroProgressForm. Throw a few controls on it: a label to display the current operation description (StepName), a progress bar for the current operation (ProgressBarLabel), a label to display the text progress (StepProgress), and a cancel button (CancelMacro). My form looks like this:

I implemented a progress bar using two labels, changing their styles and colors (one displays progress, it is located above the other, which is a frame). Let's switch to the form code window. You can right-click on the form in the editor and select "View code". Let's create three variables, make them private and thus accessible only to the form. The first one will contain the maximum progress value for the current operation, the second one - the current progress value, and the third one - the flag, whether the user canceled the operation:
|
1 2 3 |
Private maxProgress As Integer Private currentProgress As Integer Private progressCancelled As Boolean |
Next, we write the cancel button handler:
|
1 2 3 4 5 6 |
Private Sub CancelMacro_Click() If MsgBox("Do you want to cancel your fixing operations?", _ vbQuestion Or vbYesNo, "Cancel?") = vbYes Then progressCancelled = True End If End Sub |
Here we ask the user whether it is necessary to cancel all macro operations, and if the user agrees, set the progressCancelled value to True. Next, we write a number of functions that will control the progress of execution. Our form can run several macros in a row (although we have implemented only one so far). Let's consider this and write several public functions that each macro will be able to use:
|
1 2 3 4 5 6 7 8 9 10 11 12 13 14 15 16 17 18 19 20 21 22 23 24 25 26 27 28 29 30 31 32 33 34 35 36 37 38 39 40 41 42 43 44 45 46 47 48 49 50 51 52 53 54 55 56 57 58 59 60 61 62 63 64 65 66 67 68 69 70 71 72 73 |
' Increases progress by one. ' Returns False if the operation was canceled Public Function IncreaseProgress() As Boolean IncreaseProgress = IncreaseProgressImpl(currentProgress + 1) End Function ' Sets current progress value ' equal to the current page number. ' Returns False if the operation was canceled Public Function SetSelectionPageNumber() As Boolean SetSelectionPageNumber = IncreaseProgressImpl( _ Selection.Information(wdActiveEndPageNumber)) End Function ' Sets new current progress value. ' Returns False if the operation was canceled Private Function IncreaseProgressImpl(newProgress As Integer) As Boolean currentProgress = newProgress If currentProgress > maxProgress Then currentProgress = maxProgress ' Change the width of the progress bar label Me.ProgressBarLabel.Width = _ (currentProgress / maxProgress) * (Me.ProgressBarBackLabel.Width - 4) ' Update the text value of progress RefreshProgressText ' Return False if the operation was canceled ' by pressing the cancel button IncreaseProgressImpl = Not progressCancelled End Function ' Sets the maximum progress value. ' Returns False if the operation was canceled Public Function SetMaxProgress(value As Integer) maxProgress = value currentProgress = 0 Me.ProgressBarLabel.Width = 0 Me.ProgressBarBackLabel.Visible = True Me.ProgressBarLabel.Visible = True RefreshProgressText SetMaxProgress = Not progressCancelled End Function ' Sets the maximum progress value ' based on the total number of pages in the document. ' Returns False if the operation was canceled Public Function SetMaxProgressByPageCount() SetMaxProgressByPageCount = SetMaxProgress( _ ActiveDocument.ComputeStatistics(wdStatisticPages)) End Function ' Checks if the operation was canceled, ' and returns True if it was. Public Function CheckCancel() ' Process accumulated window events ' so that our form does not freeze DoEvents CheckCancel = progressCancelled End Function ' Sets the current operation description Public Sub SetStep(name As String) Me.StepName.Caption = name & "..." Me.StepProgress.Caption = "" Me.ProgressBarBackLabel.Visible = False Me.ProgressBarLabel.Visible = False DoEvents End Sub ' Updates the text value of progress ' and processes accumulated window events Private Sub RefreshProgressText() Me.StepProgress.Caption = currentProgress & "/" & maxProgress DoEvents End Sub |
The flow will be as follows:
- The macro receives a progress form instance, the macro can call its public functions.
- The macro calls
SetStep, passing a text description of what it does. The progress form will display this description and hide the progress bar and the label (as progress is not known for now). - The macro calls
SetMaxProgres, indicating the maximum progress value for its operation. Alternatively, the macro can callSetMaxProgressByPageCount, then the maximum progress value will be set to the total number of pages in the document. Our macro to remove extra line breaks will do exactly that. We don't know in advance how many spots with consecutive line breaks there are in the document. This call will display the progress bar and the label, as the form now knows the maximum progress value. - The macro calls
IncreaseProgressorSetSelectionPageNumberin order to increase the progress. The form will automatically update and draw everything. - The macro can either check the return values from these functions, or regularly call
CheckCancelto determine if the operation has been canceled by the user.
We need one last function:
|
1 2 3 |
Public Sub ResetCancelState() progressCancelled = False End Sub |
It resets the cancel flag, and this function will be called before any macro execution by the first form we've created.
Now let's refine our RemoveExcessiveLineBreaksImpl function to make it work with the progress and cancellation form. We'll add a corresponding parameter to this function. I'll write the full code and comment the changes:
|
1 2 3 4 5 6 7 8 9 10 11 12 13 14 15 16 17 18 19 20 21 22 23 24 25 26 27 28 29 30 31 32 33 34 35 36 37 38 |
' New progressForm parameter Sub RemoveExcessiveLineBreaksImpl(pageNumbers As Collection, _ includePageNumbers As Boolean, progressForm As MacroProgressForm) ' If the progressForm argument was passed, ' then set the current operation description ' and the maximum progress value based ' on the total number of pages in the document. ' If SetMaxProgressByPageCount returned False, ' then the operation has already been canceled, so we exit. If Not progressForm Is Nothing Then progressForm.SetStep "Removing excessive line breaks" If progressForm.SetMaxProgressByPageCount() = False Then Exit Sub End If Dim lineBreakSearchRegExp As String lineBreakSearchRegExp = GetLineBreakSearchRegExp() Selection.HomeKey Unit:=wdStory While FindNextText(lineBreakSearchRegExp, True) = True If NeedToProcessCurrentPage(pageNumbers, includePageNumbers) Then RemoveNextEnters End If ' If the progressForm argument was passed, ' then we increase the progress based on ' the current page number where the cursor is positioned, ' and then check the return value. ' If False is returned, then the operation was canceled, exit. If Not progressForm Is Nothing Then If progressForm.SetSelectionPageNumber() = False Then ClearFindAndReplaceParameters Exit Sub End If End If Wend ClearFindAndReplaceParameters End Sub |
There are not so many changes, and now our macro is ready to work with the new interface. Don't forget to refine the old RemoveExcessiveEnters function:
|
1 2 3 4 5 |
Sub RemoveExcessiveEnters() ' The last "Nothing" was added - in this case ' we don't need the progress form. RemoveExcessiveLineBreaksImpl Nothing, False, Nothing End Sub |
Finally, we change the DocumentFixer form code so that it transfers the prepared progress form to the macros it invokes. We need to display that form, too. There are very few changes, it makes no sense to paste the entire code. After the ActiveDocument.Activate line we add the following:
|
1 2 |
MacroProgressForm.Show MacroProgressForm.ResetCancelState |
When calling the macro, we now pass the progress form to it:
|
1 2 3 4 5 6 |
If Me.RemoveExcessiveLineBreaks.value = True Then RemoveExcessiveLineBreaksImpl pageNumbers, _ Me.ExcessiveLineBreaksIncludePages.value, _ MacroProgressForm Set pageNumbers = Nothing End If |
In the end, right after the Finish label, add the following line to hide the progress form:
|
1 |
MacroProgressForm.Hide |
That's all, folks! Now our high-tech macro can display its operation progress, and we can cancel its execution at any time. At the same time, we preserved the original old macro RemoveExcessiveEnters, which was written in the first part of the article. Here is how the progress display form looks like during execution:

The numbers 60/893 below is the amount of the page on which the last change was made, and the total number of pages in the document before the macro started. And here is the cancellation dialog:

We can even further improve our macro infrastructure. We can add any number of macros with necessary settings to the DocumentFixer form, and all of them will be able to work with the progress display and operation cancel form. We can also, for example, improve the undo history of macro operations. Currently Word logs every smallest action performed by a macro, but we can make some of these actions combine into named groups with meaningful names, and the Word undo menu will not have such a mess of a lot of obscure operations.
But let's come to the conclusion. If someone needs an improvement from the ones listed above, perhaps I will make a separate post on that subject. As a bonus, I added a picture to the form, and a screenshot of this form is at the very beginning of this post. Moreover, I added some code so when you reset the RemoveExcessiveLineBreaks checkbox, all controls related to our macro are disabled (and enabled again when the checkbox is set). If you're interested, you can download the full source code for macros and forms and import them to your Word.